#7 SEVENTH LESSON OF PROJECT – SOLAR POWER TRAFFIC LIGHTS

Hello everyone, my aim for this lesson was to finish me stem project and begin my evaluation. I almost finished my whole model, but I just needed coloured cellophane to finish it off, I did not get to that today. Unfortunately, ALL of our lessons next are taken. So I’m going to pretend that I had a lesson and use as much time as I need to finish my evaluation and my project, I really enjoy STEM and want to put as much effort as possible into my work! Next week, even though I will not have a lesson, I will still keep you informed on what had been going on during that week. Again, Unfortunately, next week my STEM blog posts will come to an end, and so will my STEM lessons for semester 1 :(.

This lesson I was extremely busy and most of the lesson was extremely challenging. Glueing the top on last was not the best idea as I needed to get to the bottom of the box, but I managed in the end. Unfortunately, I do not have any photos for this week’s progress, but in my next post I will attach all the images I missed from this week as well as my final product.

Challenge 1:

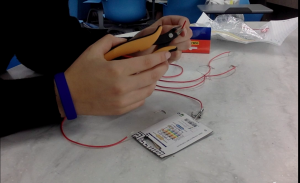
Untangling the circuit. For some reason, every time I get my circuit out, It always manages to become tangled and 1 or 2 parts fall off. From this, I have learned how to securely attach the wire onto the circuit parts so they do not slip out of place.

Challenge 2:

Getting the glue gun and my hand to reach all the way to the bottom of the box to secure the wires at the back. My worries for this was that the glue would impact the flow of energy through the circuit, luckily, this didn’t happen and my circuit is working majority of the time.

Challenge 3:

Putting aluminium foil around the LED lights in a cone-like shape. I had a very difficult experience with this as the cones were slightly too small and I had to get the glue gun through the traffic light holes which was a difficult procedure. In the end I succeeded and was glad to.

To finish off the lesson, I glue the top on and in my opinion, it looks good! I can’t wait to present this project to the class and others in different year levels! I should probably get to writing my evaluation before it’s due on my timetable. Stay tuned for the last post of my blog with my evaluation attached to it!

Until next week’s post!

#6 SIXTH LESSON OF PROJECT – SOLAR POWER TRAFFIC LIGHTS

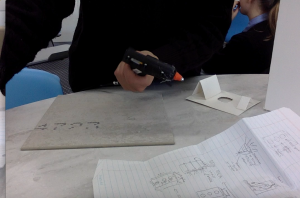
Hi everyone, sorry for the late post for this week. This week I got stuck into craft and began to build the box for the traffic lights. My aim for this lesson was to finish the box. Next week is week 7 and my goal for week 7 is to finish constructing the traffic lights and beginning to write the evaluation. I will plan to finish the evaluation in the lessons in week 8 and begin to put together a booklet. To present my project, I am planni


ng on getting a clear A4 binder and printing off all my work and slipping it in the plastic sheets. I hope that this idea will succeed!

In the lesson I began by getting the front piece of card and cutting out holes with the diameter of 6cm. I cut three of these out.I then gathered

a hot glue gun and started to glue the edges of the base. What I then realised was that the glue was drying to quickly, this was a challenge that I had to overcome. To do this, I would place the bottom edge of a side piece and glue the piece straight onto the base. I would continue this process until all the edges were glued down. What I then realised was that I almost forgot t


o leave one side unglued to I could put my circuit inside. I realised that the piece that I wanted to keep unglued was already glued on so I made a compromise and left the top piece open and unglued. On the top piece I cut a hole small enough for the wires of the sola

r pan

el to fit through and to reach the rest of the circuit. On top of this, I glued on a stand for where the solar panel would sit onthe top. I put this at an angle in which the solar panel could gain the most sunlight.

Unfortunately, I have not been successful to getting my project to work using solar energy. I will keep looking into this and continue to constantly check and improve my circuit to find out why it is not working.

You will find pictures of my progress!

Well that’s all for this week! Until next week!

#5 FIFTH LESSON OF PROJECT – SOLAR POWER TRAFFIC LIGHTS

Today was very busy and there were many interruptions during the lesson. Today, I tested my circuit and cut out the base and walls for the traffic lights. I cut out 2 x 12cm by 25cm pieces of card, 2 x 25cm by 10cm pieces of card and 2 x 12cm by 10cm pieces of card. Out of this, I am planning to create a cube. Obviously one of the side panels must be removable in order for me to be able to tweak or change the circuit when I need to. My aim for next lesson is to begin my evaluation. To achieve next lesson’s goal, I am planning on hot glue gunning the pieces of card together and testing the circuit when the sun is shining as bright as possible.

Throughout this task, I am finding it very difficult to get my solar panel to conduct solar electricity. I think that this is due to the amount of sunlight during the winter as the sun is usually weaker during winter. During this period of time, I have been trying to research substitutes for sunlight and see if the light of an LED torch has the right energy for the solar panel to transfer through my circuit.

Another challenge that I have faced since I have gotten my solar panel, is figuring out where the positive and negative wires go. This may sound unintelligent, but on the solar panel I have, there are either copper or iron plates that I can connect my circuit wires to. I asked my very helpful teachers and they believe that the copper plates are the right connecters for my circuit. I also found out that my solar panel is 1.5V (volts) or 500mA (amperes or amps for short). I then found out that the voltage had nothing to do with why my circuit wasn’t working because if you need more energy, you will need a larger voltage. For example, a tumble dryer with a 1.5 volt battery has enough energy to generate heat to slowly evaporate the water in the clothes. I found that this website helped me understand voltages:

https://www.explainthatstuff.com/voltage-optimisation.html

One thing that I was REALLY positive about in the lesson, was finding out that my circuit really works so I know that my circuit isn’t the problem. To test my circuit, I connected my circuit to a 9V battery. By connecting the alligator clips to the conductor of electricity at the end of each LED, I was able to produce light!!! After this I was VERY happy!!!

I am really excited to get cracking on with my project and find out if it works!

Until next week!

#4 FOURTH LESSON OF PROJECT – SOLAR POWER TRAFFIC LIGHTS

Today, my aim was to finish building my circuit and test it, but unfortunately I could not test it as the day is overcast. Next lesson, my aim is to build my box.

On Monday, I collected the following materials:

– 1 X alligator  clip

– 1 X roll of circuit wire

– 3 X LED lights

– 1 X solar panel

– 1 X pliers

– 1 X resistor

I figured that instead of buying craft wire to use as a conductor of electricity, I was looking at my desk at home and saw a paper clip. I then immediately though that this would be a cheaper (free) and an easier way to construct my circuit. (I always try to think creatively!). I decided to use paper clips. I ended up beginning by circuit on Monday night and finished today, so far I am on track. If I can test my circuit next lesson (or whenever there is a sunny day), if it works, begin my box, if the circuit doesn’t work, find out why and fix it.

Today, I finished my whole circuit and attached below are some pictures of how I did it.

Today I learned how to strip a portion of the insulator of a wire and how to connect them to a part of a circuit without the wire slipping off. I also learned how to attach a wire onto an alligator clip as I wasn’t extremely confident about it and I didn’t want a small detail to prevent my circuit from working! The challenge for me this lesson was wrapping the wires around segments of my circuit, I could that the wires would easily slip off and would always unravel. I also found that the paper clips were also hard to bend as the metal was thick so I was thinking of using some tweezers or pliers that grip from home so I wouldn’t hurt my fingers or damage the wire, it would also make it easier for me to wrap the circuit wires around parts of the circuit. I am still unsure if I want to use soldering to guarantee that the wires wont fall off.

For my box next week, I am planning on using the cardboard from a white shoe box. I am not exactly sure if the cardboard will be too thin, but if it is, I can always go to Bunnings and get it there for free. I love that shop!

Overall today, I had a lot of fun building my circuit and are keeping an eye out for a spot of sun to test my circuit. I really hope it works!

#3 THIRD LESSON OF PROJECT – SOLAR POWER TRAFFIC LIGHTS

Today, I stuck my head in the game and finished my materials list and costing and risk assessment. The total cost for each individual parts is $16.04c, but the total cost (because of value packs and not individual sale) $19.02c. I have finally decided that I am not going to be making the traffic lights out of 3D printing plastic, but of cardboard.

My goal for this lesson was to finalise my materials list and costing and risk assessment. I did that, but I also managed to fit in my design process as well. I found that finding small solar panels online is actually quite challenging and I finally found one that is 7.4cm by 14cm which is perfect for my project. I also found that it is hard to find cellophane of different colours online. I checked a variety of shops but they either had only clear or no cellophane. I finally found coloured cellophane which is $1.49c per colour. Below are my materials list and costing as well as the links that I bought some of the items from.

MATERIALS LIST AND COSTINGS


ITEM QUANTITY COSTING X 1 TOTAL COSTING
Cardboard 1 box Free @ Bunnings Free
Soldering iron 1 School Supply
Soldering lead 1 School Supply
Plyers 1 School Supply
Reflective paper (alfoil) 3 Alfoil from home
Cellophane (in dif. Col.) 3 (red, yellow, green) $1.49c $4.47c
Circuit wires 2 (red + black) School Supply
Wires 1 (cut into 3) $4.60c $4.60c
Alligator clips 1 $0.44c (From School) $2.62c (From School)
Lights 4 (1 extra) ASK SCHOOL
Solar panel 1 $9.95c (4+ = $8.95c) $9.95c
Hot glue gun 1 Home Supply
Resistor 1 School supply
TOTAL: 18 $16.04c $19.02c


Bunnings

https://www.bunnings.com.au/lytworx-100-led-solar-party-lights-warm-white_p0011698

https://www.bunnings.com.au/tic-30-5m-picture-hanging-hobby-wire_p3930101

https://www.bunnings.com.au/projecta-alligator-clips-6-pack_p6330687

Jaycar

https://www.jaycar.com.au/hobby-solar-module/p/ZM9012

Spotlight

https://www.spotlightstores.com/party/party-essentials/cards-gift-packaging/tissue-cello-wrap/artwrap-cello-sheets/p/BP80188841


Here is my risk assessment:

Burns

This may occur from the soldering iron, the overheating of the solar panel and/or the hot glue gun. If this event occurs, run burnt skin under cold water for 5 minutes. If continues to swell or sting, seek medical attention and/or go to the nurse. If available apply ice to stop stinging or swelling. If object catches fire, seek attention from the teacher and use fire distinguisher to put out fire. If fire becomes out of control evacuate the building. If fire goes to the extreme call triple zero (000).

Electrocution

If electricity is flowing through the circuit and bare wires are exposed, electrocution could occur. When this occurs, electrons travel through your body, guessing that it’s a shorter or easier route for the energy to flow through. If this occurs avoid all sources of water and do not touch the person. Break the current between them and the current, to do this you will need to use plastic or wood as you CANNOT touch the person. After the current is broken, you are able to give them first aid. If the shock is very bad dial triple zero (000). If needed, perform CPR.

Cuts

If a paper cut, cellophane cut or alfoil cut occurs, use tissue to remove blood and then (optional apply a band aid if needed. If a small piece of material enters the skin and cannot be removed, seek attention by teachers.

If a small cut from scissors occurs, use tissue to remove blood. If medium cut occurs, seek medical attention and use a tissue to remove blood. If cut it large, immediately seek medical attention and stay calm. If extreme cut from scissors, seek medical attention and call triple zero (000).

http://www.preparednesspro.com/how-deal-electric-shocks-and-electrocution

I don’t think that I will be taking the injuries to the extreme, but it is worthwhile understanding what to do if injuries do occur.


Here is my method/design process:

  1. Assemble circuit:
    1. Get black wire from solar panel
    2. Get black wires from LED lights
    3. Connect the 3 black wires from the LED lights
    4. Connect the 3 connected black wires to one side of a resistor
    5. Connect the black wire from the solar panel to the other side of the resistor
    6. Get WIRE (from materials list) and cut into 3, 2cm pieces
    7. Get red wire from solar panel
    8. Attach wire to alligator clip
    9. Attach each red wire to one piece of cut wire
    10. Bring into sun and test
  2. ONLY PROCEDE WHEN CIRCUIT IS SUCCESSFUL
  3. Get or create cardboard box
  4. Make 3 circular cut outs
  5. Create stand for solar panels
  6. Use hot glue to attach stands to box
  7. Bend the pieces of metal and attach them to the box
  8. Get the LED lights and put a cone of aluminium foil around each one
  9. Connect edge of cone to inside of circle cut outs
  10. Cut cellophane into circles and hot glue on to cut outs
  11. Close the cardboard box


After this, I also learned that solar panels are best placed at a 34° angle for more sun coverage.

Next week I will be documenting arduinos and the beginning of my building process for my:

Solar Powered Traffic Lights!

#2 SECOND LESSON OF PROJECT – SOLAR POWER TRAFFIC LIGHTS

ACCOMPLISHMENT – 30th POST!!! 🙂

Today I did accomplish my goal. My aim for this lesson was to finish my drawings and and get half way through my materials list and costing. For my homework time tonight (20 mins), I am planning to finish my materials list and costing. Next week I am planning to develop my risk assessment and begin to plan my process of how I will build my Solar Power Traffic Lights.

To begin my lesson, I researched how my circuit will work and got some ideas on what I can use to improve my design. I watched a video and found out that you can use reflective or mirrored paper to increase the brightness of the LED lights if they are not very large. I found that this is helpful as I am only planning on using on LED light per colour. After drawing and researching how the circuit will work, I applied it to the design I am planning to use. By drawing what I want my project to look like, I managed to develop an efficient way that the circuit would run through the box, without wires getting tangled up.

After this I continued on my materials list and costing. I started researching the places where I could purchase some of the materials. I found that there were 18 materials in total that I needed to construct my design with. I was doubting the idea of 3D printing the box, as cardboard may be a better option as I can change it if I don’t like the way it looks or if the design doesn’t go as planned.

I did end up finishing my research before the lesson and I can’t wait to finish my risk assessment so I can start building my solar powered traffic lights!

#1 FIRST LESSON OF PROJECT – SOLAR POWER TRAFFIC LIGHTS

I know that you may have not heard from me for a while, this is because I just had term holidays. Today we were actually began to start our projects.

To begin the lesson with, I designed a table of goals which had all the topics I needed to cover and the weeks I would complete them in. Next week I am aiming to do some scientific drawings of what my solar powered traffic lights will look like and the measurements for them, as well as begin my materials list and costings.

TOPIC AIM ACTUAL COMPLETE DAY
Title page LAST
Contents/tabs LAST
Proposal WEEK 1 WEEK 1
Research WEEK 1 WEEK 1
Diary/log DURING PROCCESS
Drawings WEEK 2
Materials lists and costings WEEK 2-3
Risk assessment WEEK 3
PROCCESS WEEKS 4-6
Design process photos of progress WEEK 7
Evaluation WEEK 7
Bibliography DURING PROCCESS

After this, I wrote my proposal and started and almost finished my research. I included many things in my proposal, for example, the good and bad things, the directed audience and the problem it is addressing. As for my research, I looked at what solar powered traffic lights were and the comparison to normal traffic lights, I looked at how to 3D print (as I am thinking of 3D printing the box where all the circuits will be placed), I researched how solar panels work and I also recorded all the links which I used (including the links of some useful videos).

To prove that I have done the proposal and almost finished my research, I have copied and pasted it down below.


PROPOSAL

My idea is an eco-friendly way to direct and control traffic. I will aim to create solar powered traffic lights. I think that this idea will have a positive impact on the environment as instead of using man-made energy, renewable energy can be used. By doing this, we can take the sun for granted and use it instead of wasting it. Traffic lights are present everywhere in high populated areas and solar panels are not commonly used among traffic controls.

The issue that I am addressing is environmental damage and pollution. Solar panels are an eco-friendly way to use the sun’s rays to power appliances. Solar panels are also recyclable and can be reused for other purposes. I think that this can also help minimise landfill. Furthermore, instead of digging up the ground and running powerlines underneath the surface, the solar powered system is wireless and just needs to be connected to a system that keeps track of the light sequences.

My target audience is anyone in the world that drives a vehicle, rides a bike or walks or crosses a road.

The only downside to this idea is that:

  • They would have to be regularly cleaned
  • There would need to be a backup battery in case of a day where there is no sunlight
  • They are easier to disconnect
  • They would need to be waterproofed
  • They would need to be checked in general regularly
  • Costs

In conclusion, this idea is good for the environment as this may minimalize landfill and uses renewable energy. I think that this may also help erosion in the ground as there would not be digging under the ground, this makes laying roads easier. In my opinion, we don’t use the energy of the sun enough and I think that this is a good way to use it and take it for granted. If normal traffic lights are damaged and need to be removed, they are likely to go into landfill because their materials are not recyclable. I think that using solar panels can help minimalize landfill and then later minimalize pollution.


RESEARCH

Solar panels:

Most solar traffic lights use LED lamps as they are more reliable, but normal traffic lights use bulbs with mercury in them. Solar powered bulbs have more advantages over other lighting devices like CFL lamps as they are more energy efficient, turn off quickly and have a longer life span. Solar traffic lights contain enclosures which house the batteries and the control panel circuitry. Solar powered traffic lights also come in handy when there are power outages as they don’t need manmade energy to sustain them.

Wiring:

Wiring occurs under the ground and is very expensive to install. It may cause erosion in the ground and destroy the original health of the soil and ground. This process may also take a long time to install and prepare.

HOW SOLAR PANELS WORK – WORK IN PROGRESS


PROCESS:

  1. 3D code the box
  2. gather wires and a solder iron
  3. get a solar panel
  4. measure dimensions of size
  5. solder pieces and globes
  6. test circuit
  7. once finished, hot glue together

HOW to 3D print:

http://www.instructables.com/id/How-to-Design-a-3D-Printable-Box/

http://www.instructables.com/id/Customizable-3D-Printable-Boxes/

Video links:

https://www.youtube.com/watch?v=3N3ApzmyjzE

https://www.youtube.com/watch?v=F6S0qif2C1w

Information links:

https://en.wikipedia.org/wiki/List_of_solar-powered_products

https://en.wikipedia.org/wiki/Solar_traffic_light

http://perryelectricsd.com/services/underground-electrical-conduit/

http://articles.courant.com/2012-01-28/news/op-hc-tanaka-underground-electric-wires-expensive–20120128_1_underground-utility-lines-cable

https://www.livescience.com/41995-how-do-solar-panels-work.html


Please let me know if there is any other information that I need to be aware of or need to include to make my idea successful. 🙂

STEM CODING 3RD LESSON

Today is going to be a short blog post because this is the last lesson of STEM for term 1. Today was the last lesson of coding and the last week of blog posts for Term 1. I progressed from lesson 7 problem 9, to lesson 8 problem 10. I think that in this double lesson, I progressed quite a lot and are happy with how much i’ve done during the past 3 weeks. I think that overall, this term has been very busy, experimenting with different aspects of technology for example soldering.

I cant wait until next term to begin my solar power traffic lights project!!

STEM CODING 2ND LESSON

Hi Everyone,

If you were wondering why I didn’t post last week, it’s because I was on camp. In this double lesson, I got up to lesson 7 problem 9. I think that this lesson, I did not progress as fast as I did in the last coding lesson because I spent some of the time helping people and problem solving with challenging questions. I am still proud of what I have achieved and hope that I will keep going on.

One of the problems that I encountered during the lesson was answering a worded question about my code using the words ‘incremental’ and ‘iterative’. This was in unit three, lesson seven and problem 4. I found this a bit challenging as I had only heard of incremental, the word ‘iterative’ I had never heard of, hadn’t known what it meant, or how to use it in a sentence. The first thing I did to solve this problem was work out what the words meant in relation to code and how they are used in a sentence. I now know that ‘incremental’ means an increase or an addition and ‘iterative’ means to repeat. The screenshot below shows the question and the response I added to it. I still am not extremely sure that my response is correct but from this I did learn m
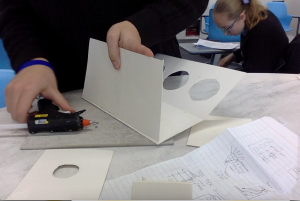
ore vocabulary and how it relates to code.

After I passed this, I finished lesson 6 and moved onto lesson 7. Lesson 7 is all about adding pen widths, pen colours, angles to turns, amount of pixels moved forward, the degrees of arches/curves, and the RGBA (colours R = red/G = green/B = blue/A = alpha, opacity). While doing lesson 7 I also encountered a challenge. I didn’t quite understand that you can’t have a block that says “pen colour ‘pink’ ” and a RGBA block. I later found out that this is because the RGBA was the colour block that was needed as I had to input the amount out of 255 how much red, green and blue was in the colour. Furthermore, alpha/opacity, was out of 1 (0.5 being 50%).

At the start of lesson 7 I got a vocabulary introduction (image below) of what I was going to get introduced to.

Apart from the coding aspect of today, I did a little bit of problem solving myself when I was helping friends with their code. Their code was a little bit different to mine, making it a little bit difficult for me to understand it. After problem solving we finally figured out the problem and we celebrated and moved onto the next problem.

We were asked to do a self reflection on how we think we did for this term for STEM based on our effort.

1 = excellent

5 = not very good

I think that for completing class homework, I deserve between a 1 and a 2. I think that this is because I did complete my homework and included some detail, but there is always room for improvement.

For accepting teacher feedback I probably deserve a 1 because I always try to understand from a teachers perspective what I could do better and how I can do that myself. I always try to incorporate teacher’s feedback into my work as they know what is best for me and how I can increase my grade.

For seeking improvement, enrichment or extension I deserve between a 1 and a 2 because I seek improvement, but i’m not sure if I do it obviously for it to be recognised. I think that I did seek extension when I said I wanted to if I finish the main part of my solar panel traffic lights, to make a sequence, which is above my skill and challenging.

For promoting inclusion and respect in class, I think I deserve a 1. I think this because I am always helping my friends and making sure I pay attention in class. I think that paying attention in class is crucial especially so you understand what your task is. I think that I try to make sure that my friends are enjoying their selves and offering help when they need it.

For demonstrating involvement in learning, I think I deserve between a 1 and a 2. This is because, I know that I am learning new facts, but i’m not sure if sometimes what i’m learning has been recognised or seen by others. I feel that I need to improve on this and make sure that I am putting my hand up more often and trying even if i’m wrong.

For being punctual and organised, I think that I deserve a 1 . This is because I always make sure that I am at class on time and emailing the teacher if I was sick to catch up on the work that had been done. I always try to get my blog posts in on time and make sure that they are all included in my blog.

I hope that this blog post wasn’t too long for you and it was interesting throughout.

My last blog post will be next week, I can’t wait until next lesson.

Until then!